Printing Product and Shelf Labels
Design product and shelf labels visually, set up the sheet or roll they print on, then choose products and quantities in the label printing window.
Existing label settings are kept when you upgrade. The first time you open a design, ROBOTILL reads your previous positions, fonts, centred text and paper spacing. Save changes only when you are ready. Receipt templates under Printing are separate from label designs.
Paper and label settings
Open Back Office > Home > Set Up and Settings > Settings > Printing Labels, directly below Printing. There are separate sections for Shelf labels and Product labels, each with a preview.
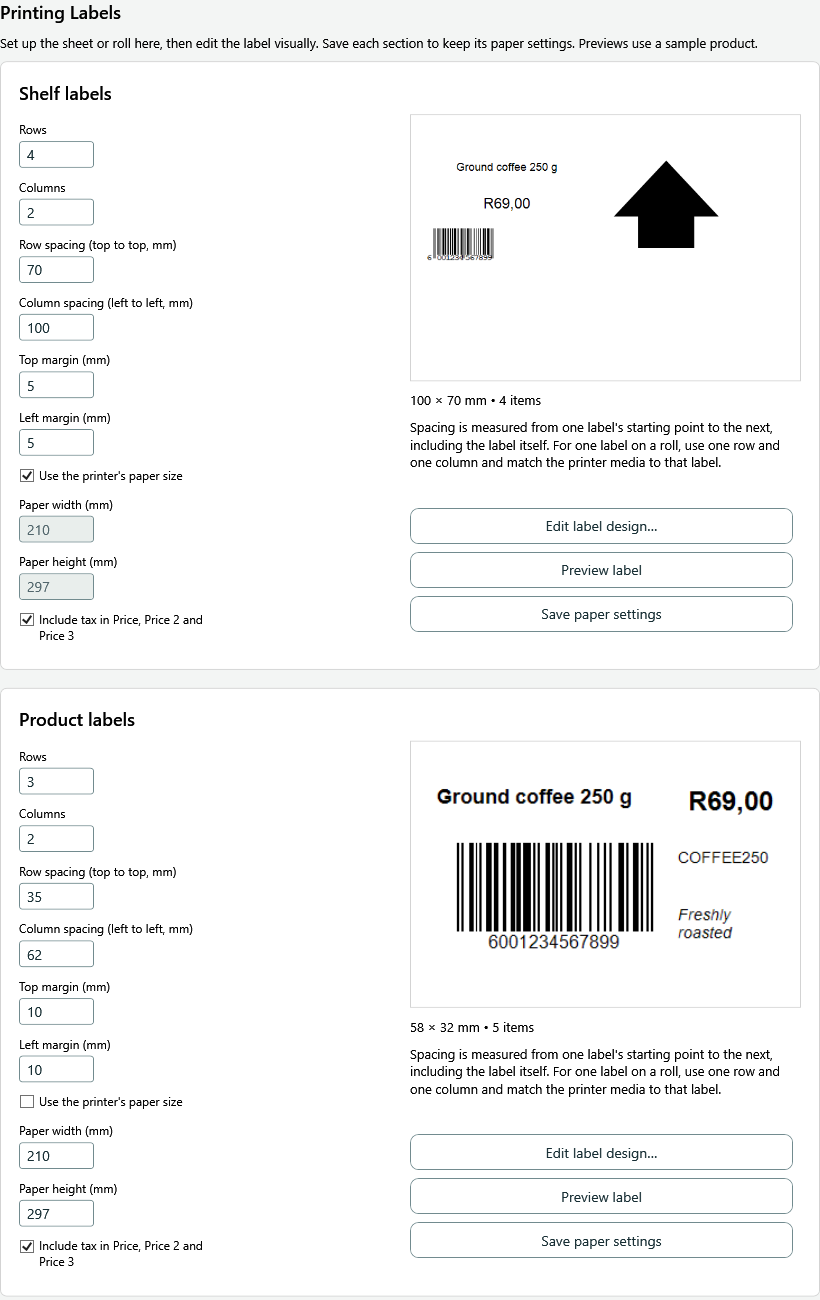 Each label type has its own paper settings and design. The product layout shown is an example of a customised design.
- Rows and Columns: how many labels are printed on one sheet.
- Row spacing: the distance from the top of one label to the top of the next, including the label height.
- Column spacing: the distance from the left of one label to the left of the next, including the label width.
- Top and Left margins: where the first label begins. Existing layouts retain their previous printer-origin behaviour.
- Use the printer's paper size: use the media selected for the printer. Clear this to enter a paper width and height in millimetres.
- Include tax: controls the Price, Price 2 and Price 3 fields. The separate Price excluding tax field always excludes tax.
Click Save paper settings in the section you changed. For an A4 sheet, use 210 by 297 mm and the rows, columns, spacing and margins supplied with your label stationery. For a roll with one label across, use one row and one column and match the printer media to one label.
Design a label
- Click Edit label design... in the shelf or product section.
- Set the physical label width and height, then click Apply label size. This changes the design area; check the sheet spacing separately.
- Drag an item from Available onto the label, double-click it, or select it and click Add selected item.
- Drag items to move them. Select an item and drag its corner to resize it, or enter exact X, Y, Width and Height values in millimetres.
- Change its font, size, alignment and other properties, then click Apply item changes. Selecting another item, Preview and Save also apply pending property edits.
- Click Preview to see the printed result without selection borders. Choose preview product lets you check a real product.
- Click Save design when ready. Closing an unsaved draft lets you discard its changes.
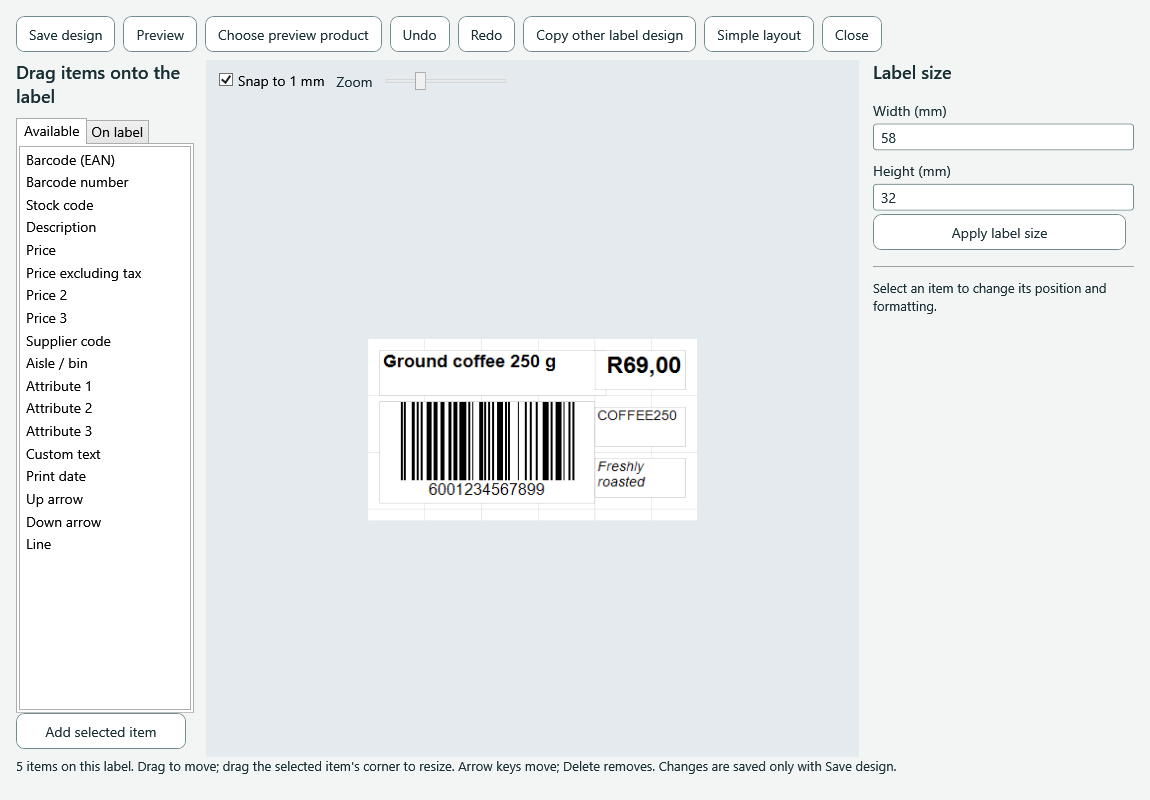 Drag items from the left onto the label. Select an item to edit its properties on the right.
Use Snap to 1 mm and Zoom for positioning. Arrow keys move a selected item by one millimetre; Delete removes it. Undo and Redo restore design edits. Duplicate creates another copy of an item. Copy other label design copies the other label type's items and label dimensions into the draft; the destination keeps its own paper settings.
For a quick starting point, click Simple layout. This creates a compact 58 by 32 mm product label or an 80 by 40 mm shelf label with a description, price and barcode. Product labels also have a stock code; shelf labels have an arrow. It replaces the draft items and label size, so check the paper spacing and margins before saving and printing. Undo restores the previous draft.
Available items and formatting
The designer offers 18 item types. You can add multiple copies and arrange up to 100 items on a label:
- Barcode (EAN), barcode number, stock code and description.
- Price, price excluding tax, Price 2 and Price 3.
- Supplier code, aisle/bin and the product's three attribute values.
- Custom text, print date, up arrow, down arrow and line.
Text can be aligned Left, Centre or Right. Choose a font and size, bold or italic, and whether text wraps. Prefix and Suffix add wording around a product value. Custom text supports line breaks. A text height of zero uses automatic height; a positive height limits the text box, so leave enough space for long descriptions.
A barcode can include its readable number. A separate Barcode number item lets you position and format that number independently; turn off Show barcode number on the barcode if you do not want it twice. Existing barcode appearances are retained until you change their number/font options or add a new barcode item.
Choose products and print
- Open Back Office > Home > Products and Stock > Print Labels. Labels can also be selected while receiving stock.
- Choose Product labels or Shelf labels in Label type.
- Enter a barcode, stock code or description and press Enter, or click Add multiple products.... Adding the same product again increases its quantity in the existing row.
- Edit the Labels column, or expand Quantities and used sheets, select several rows, enter a quantity and click Apply quantity. Use whole numbers; zero skips a product.
- For quantities based on stock, enable Use stock levels for newly added products and choose the location before adding them. Negative stock becomes zero and fractional stock is rounded down. Existing rows are not automatically changed.
- If a sheet has already been partly used, enter the number of used positions to skip. Positions run left to right across each row, then down. Only the first sheet skips these positions.
- Check the product, label and sheet counts. The preview shows the selected product, or sample data when no row is selected.
- Use Preview first sheet to check placement, then Print labels... to select the printer. The preview uses the default printer's paper when the design uses printer paper, so check the chosen printer's media before printing.
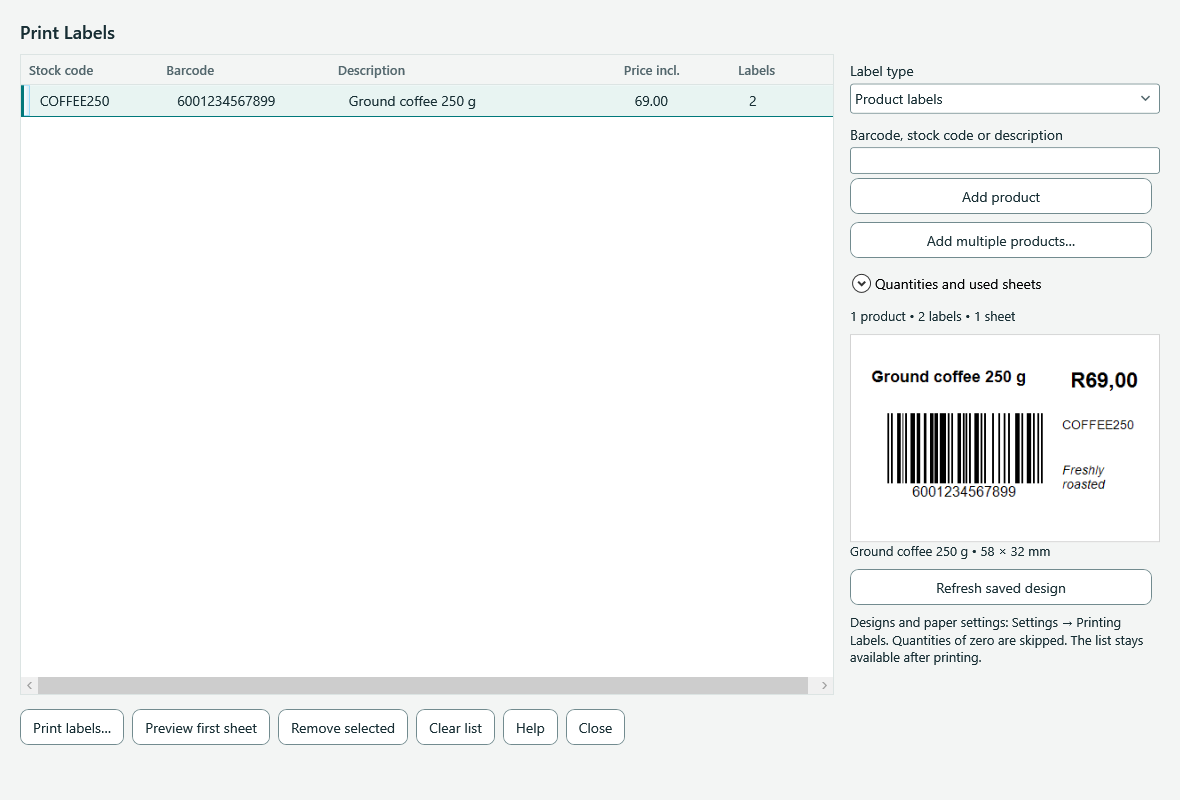 Quantities and label type are chosen in one window. A print job can contain up to 100,000 labels.
The list stays available after printing. Use Remove selected or Clear list when finished. Refresh saved design updates the displayed preview after a design was changed elsewhere. Printing and sheet preview always load the latest saved design.
Barcodes and checking the result
Barcodes use EAN-13 or EAN-8. New barcode items check the digits, length and check digit. A 12- or 7-digit base number can be completed with its check digit. An invalid or missing barcode is indicated in the product preview; other fields can still print. If needed, use Barcode Generation to assign a barcode to the product.
Keep the white area around the barcode clear. Print a small batch and scan it before printing many labels. Check long descriptions, tax options, label alignment and printer media. For printer selection or missing output, see Printer Problems.