Restaurant Tables And Tabs
In the Restaurant Module, all sales are linked to tables and tabs. To start a sale, the cashier/waiter needs to click on the Tables button
in the restaurant module. The restaurant floor plan will be displayed.
Restaurant Floor Plan
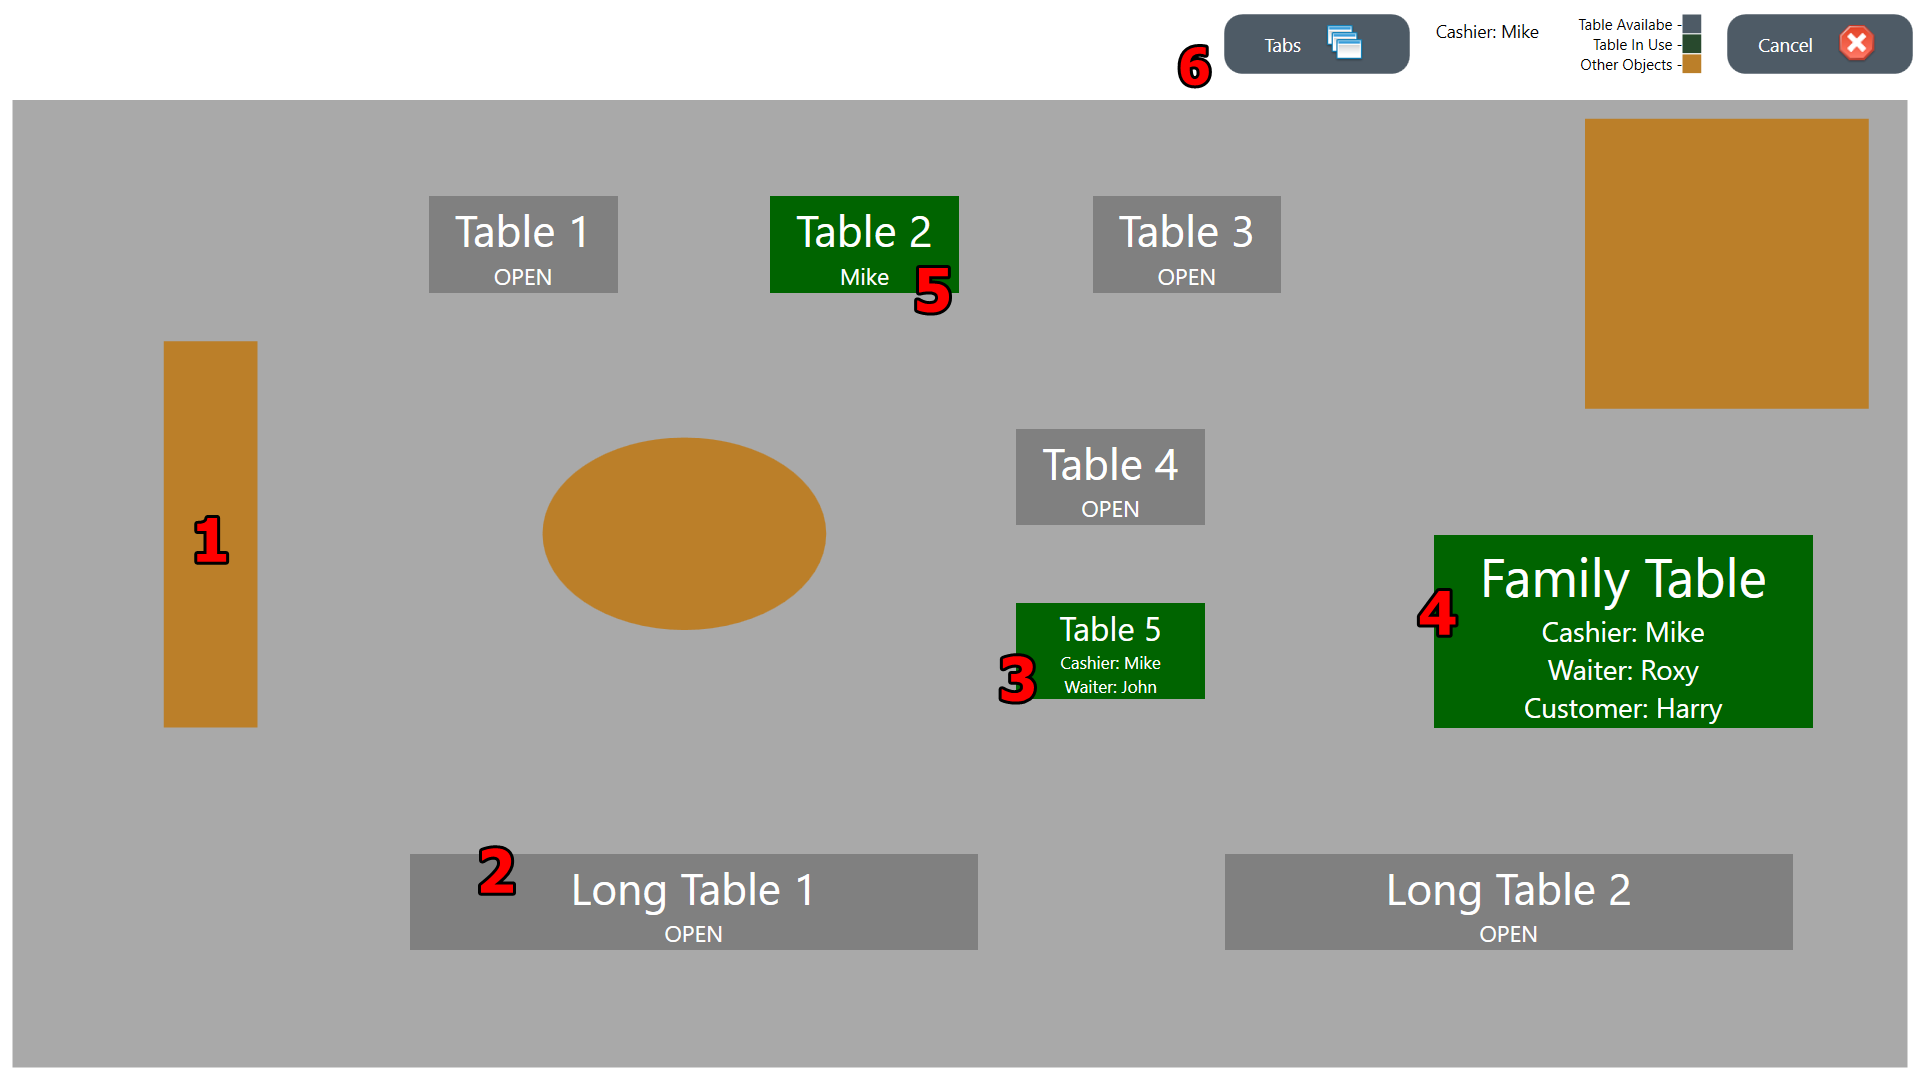
- You can add objects that are not tables to your floor plan to make it easier for waiters to understand the layout. Objects can include things like doors, walls, toilets, pay points, etc.
- A table that is not in use will display grey and contain the table name and the word 'Open'.
- A table that is in use will display green and the cashier and waiter that is linked to it will be displayed under the table name.
- If a specific customer is linked to a table, the customer name will also be displayed.
- If the cashier and the waiter for a table is the same person, then only one name will be displayed.
- From the floor plan, you can click on the Tabs button to use tabs.
To select a table you can simply click on/touch the table.
Once a sale has been allocated to a table it can be moved to another table. To move a sale select the table/sale,
click on 'Sale Options' and then 'Change Table'. All the items for the order and the waiter will be moved to the new table.
A sale that is allocated to a table can also be split into several bills. See
Split a Bill
Once you select a table and no waiter is allocated to the table, you will be prompted to select a waiter for the table
(if you chose to use waiters). For more information on how to use waiters see
Waiters.
Tabs
Tabs can be used where customers are not sitting at tables but moving around like in a bar. Unlike tables, a waiter can only see his/her own tabs.
To use tabs click on Tables and then Tabs. You can also choose to only use tabs to skip the tables step in the
restaurant settings).
This option can also be set per computer in PC Settings.
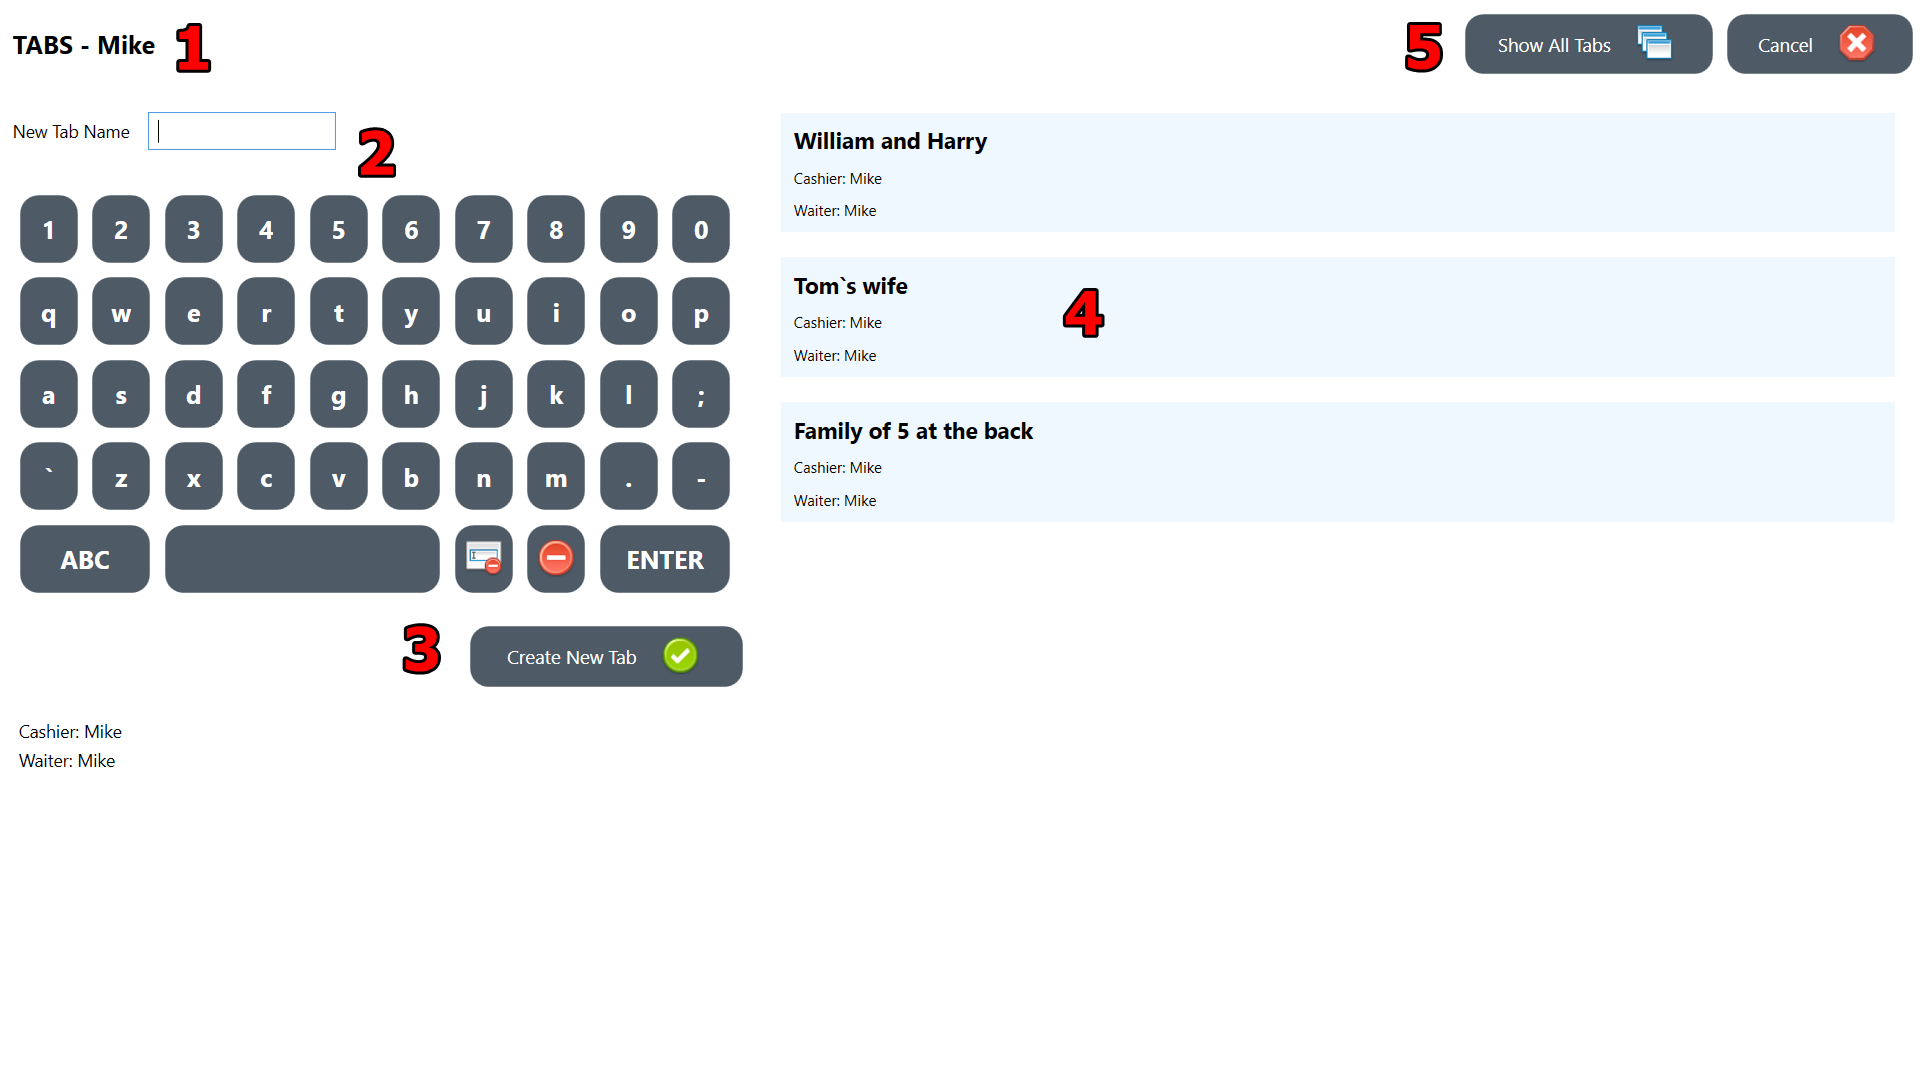
- When you click on 'Tabs', you will be prompted to select a waiter, or the waiter will need to scan his/her card or enter a PIN (depending on your
settings).
- You can enter a new tab name and press ENTER to instantly create a new tab.
- Alternatively you can use the on screen keyboard and press 'Create New Tab'.
- You can also select one of your existing tabs. Once a sale is completed, the tab will disappear from the list.
- If needed, you can view all tabs and select another waiter's tab. Depending on your security settings, you might need Manager or Supervisor authorization to do that.
Setting up the Floor Plan
To set up the floor plan (add tables) go to ROBOTILL Back Office. Home > Setup and Settings > Settings > Restaurant Settings and click on
'Edit Restaurant Floor Plan'.
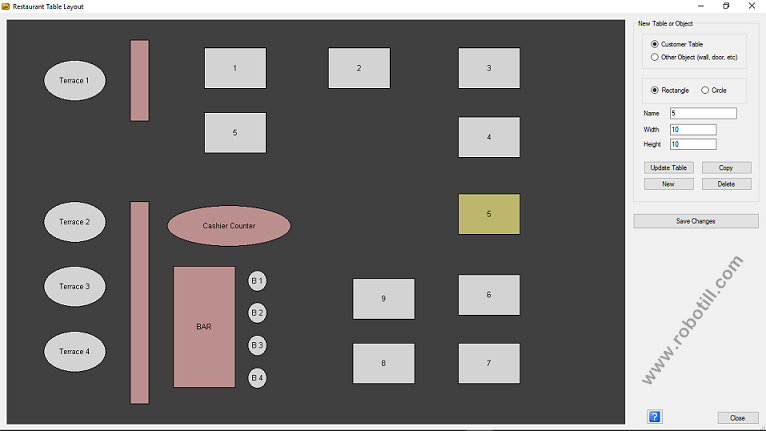
To move a table simply click on the table and drag it while keeping the mouse button down. To change a name or size, enter the
values for the name, with and/or height and click on 'Update Table'.
The height and width is a value from 1 - 100. For example, if you enter a value of 5 for the height, the table will take up 5%
of the height of the screen. If you choose 20 for width, the table will take up 20% of the width of the screen.
To add multiple tables that have a similar width and height, use the Copy button. Each time you click on Copy, it will place a
new similar table in the left top corner of the screen.
The 'New' Button will just clear the current selected table to allow you to enter a new table. You then still need to click on
'Add Table' after you entered the table information.
You can also choose if a object is a customer table or just an object on the floor plan. A customer table can be selected in the restaurant module to allocate a order to that table. So a customer table can also be:
- Pub or Bar Chairs (see image above)
- Telephone Orders
- Take-Out Orders
Other objects can be anything that will make the floor plan easier to understand for example walls, entrances, bar, kitchen, etc.
The 'Update Table', 'Delete' and 'Add' will just add it to the screen but your changes will not yet be saved to the database.
All changes needs to be saved using the 'Save Changes' button.
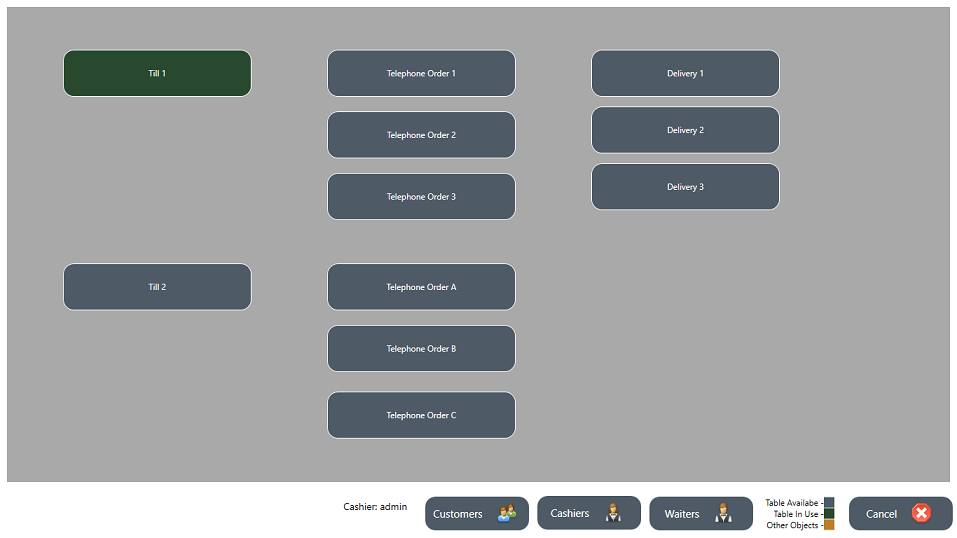
Using a Default Table
Some restaurants/shops might choose to use the restaurant module but they do not want to select a table for each sale.
An example would be a take-away shop (fast food, takeout shop). You can choose to use a 'Default Table' in the
Restaurant Settings.
This option can also be set per computer in PC Settings.
When choosing to use default tables each cashier will be prompted to select a default table the moment they log in.
A default table does not need to be an actual table in your restaurant/shop - it can simply be a placeholder for the counter sales of a
specific till/session. The table will automatically be selected after each sale.
The cashier will still be able to select another table or tabs during his session.
This can be useful if you have counter sales and sales you want to keep open for tabs or telephone orders.
It is important that each till session must have its own default table.
Create a default table for each till point you are using. If you are using shifts and a following shift will need to log in before the
previous shift did a cashup (releasing the default table), then you can create multiple tables per till -
for example, 'Till 1 - Morning Shift', 'Till 1 - Afternoon Shift'. The table names for default tables does not matter. As long as each till session
uses its own default table. You can also simply name your default tables 'Default 1', 'Default 2', etc. and then the cashier can select any open
default table when logging in.
Below is an example of a floor plan for a take-away that does not have any actual tables. Not that instead of using placeholders for telephone
orders you could use tabs instead.