Print Design and Layout
All the printed slips are completely customizable and easy to set up with the unique ROBOTILL drag and drop design tool. The slips can be any size, it can be for a POS printer but also any standard printer printing on A4, A5 or any other paper. The pages can be designed for any size.
To customize the print layout of any of any document (receipt, slip, statment, etc), in ROBOTIll Back Office, go to
Home > Set Up and Settings > Settings.
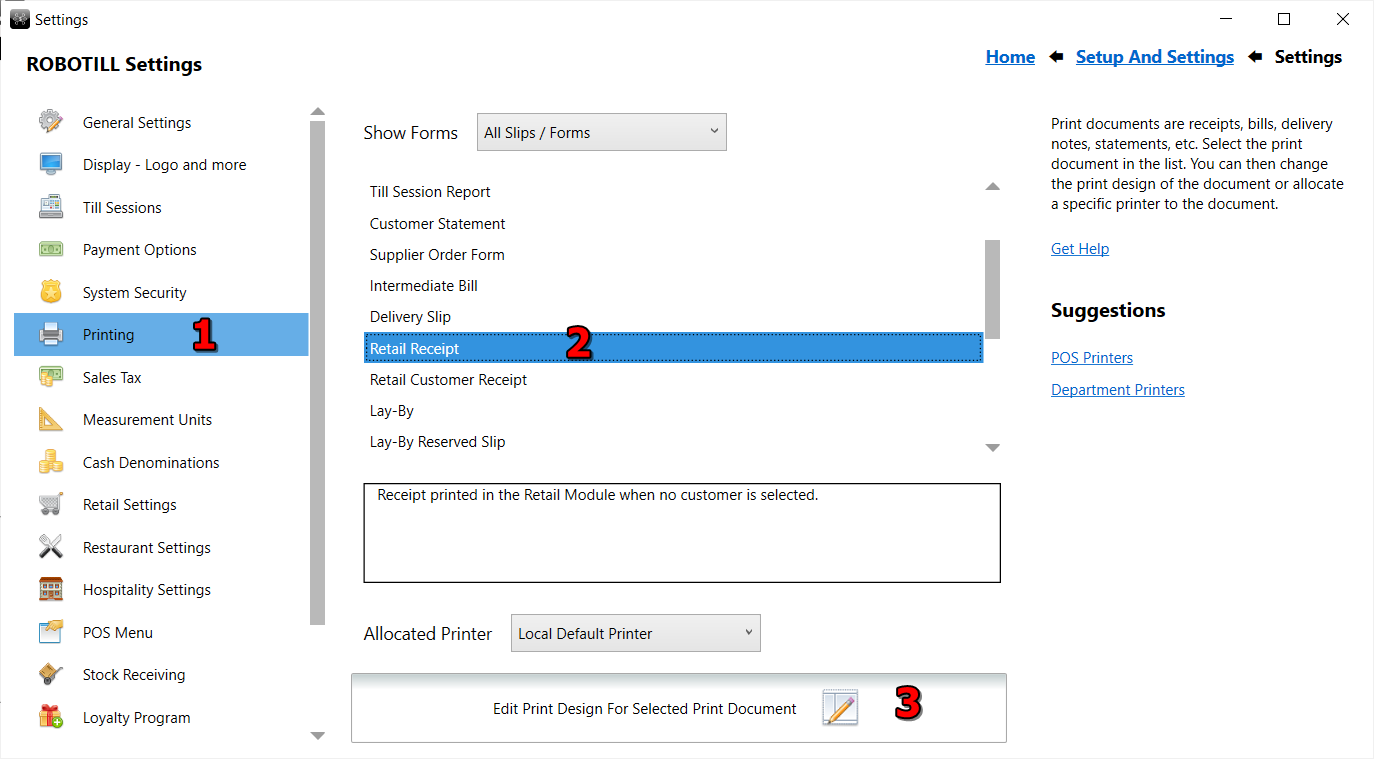
- Select Printing
- Select the document/form you want to edit.
- Click on 'Edit Print Design'
Changing your paper size
The first thing you need to do is select the correct paper size. Go to the Page Setup tab.
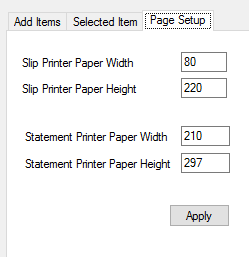
Note that these settings are applied across all printed forms printed from the POS modules (not ROBOTILL Manager).
The slip printer size will be all the slips printed from the POS Modules. This can be a POS Printer or any standard printer. The slip printer needs to be the default printer on the POS computers.
The statement paper is for the customer statements. This can be the same printer and paper as the slip printer or it can be another printer and paper size used to print the customer statements.
If you use slip paper (on a roll), specify a page height larger than the longest possible receipt that can be printed (for example 5000). Otherwise your slip printer might cut the receipt into multiple receipts or leave a couple of lines open in the middle of a receipt.
Adding items to your page
To add a item to your page layout, go to the 'Add Item' tab.

Each form will have different available items that you can choose from. An item can be a graphic (any image or logo), plain text, or a system varialbe. To add an item, simply select it in the left panel and click on Add. New items will always be added at the left top corner of the page. You can then simply drag the item to the position that you want it in.
Changing the item settings
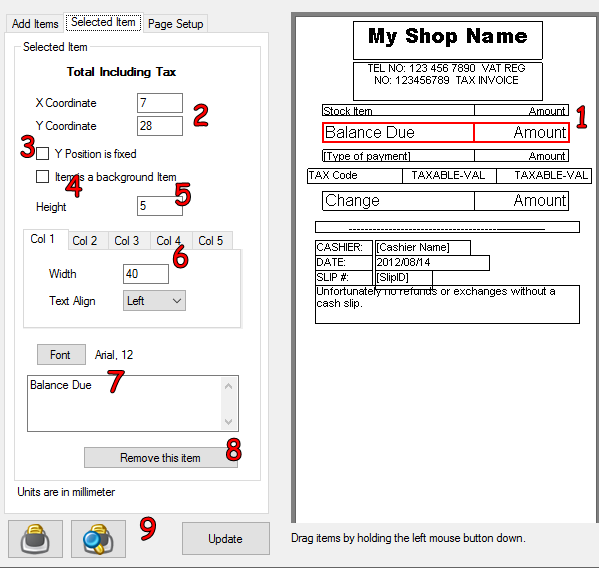
- Select an item in the form (click on the item). The item properties will be displayed on the left.
- You can enter the required coordinates or you can simply drag the item to where you want it (keep the left mouse button down while dragging). Note by default the Y position is not fixed and the item will move down the page a required (see next point).
- If the 'Y Position fixed' is checked, then the item will not move down the page. Some items on the page like the sale detail will grow depending on the number of items. It will cause all other items below that item to move down except the ones that has the 'Y Position Fixed' checked. This is useful if you want to add items at the bottom of the page and you are working with a fixed height page.
- Background items will move to the back when printed. This is useful if you for example use a background image as your 'pre-printed stationary'.
- The height of the item.
- You can specify the width of the item and the alignment of the text. Some items have multiple columns (like the selected Balance and Amount). You can specify the width and alignment for each column of the item.
- You can select the font and font size using the font button. You can also specify the text on some items.
- Use the 'Remove Item' button to remove the item from the form.
- You can print and preview your page at any time. The test print and print preview will use 'dummy data'. Remember to update your changes before closing.
Note when using cut sheet Paper
When using continues paper any items can be placed after the 'flow' items (the table items containing the details of the
sale/account). If you use cut sheet paper the items that flow to the following page should be placed at the bottom and
any other items you want (address, notes, etc) should be placed above the detail section of the document that can flow to another page.
Table Items
Table Items in the Print Design form are items that are similar to the slip detail item, where you place one item on the page and when the slip is printed all the items will be printed and everything else on the page (that is not set as fixed height) will move down.
The difference with table items is that you can put them in any order and you can choose the items that you want to add to your 'table'. With the table items you can also specify the height that each row must move down (with the slip detail items, the height is automatically calculated and you cannot change the height).
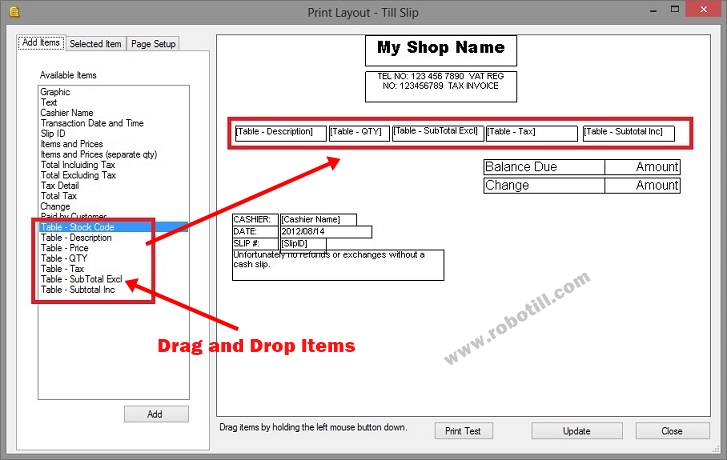
Table items are ideal if you are printing on pre-printed stationary. You can also use a graphic as 'pre-printed stationary' and set the graphic item as a 'background item'.