ROBOTILL Settings
To open ROBOTILL Settings, go to ROBOTILL Back Office > Setup and Settings > Settings
Click on the settings section below you need help with. Remember that you can also from ROBOTILL Back Office just click on 'Get Help' when you need help and it will take you to the place in the online help where you need to be.
> General Settings
> Display Settings
> Till Sessions
> Payment Options
> System Security
> Printing
> Sales Tax
> Measurement Units
> Cash Denominations
> Retail Specific Settings
> Restaurant Specific Settings
> Booking Settings
> POS Menu Items
> Stock Receiving Settings
> Label Print Setup
> Shelf Label Print Setup
> Head Office Support
> Reports
General Settings
To open general settings, go to ROBOTILL Back Office > Home > Setup and Settings > Settings > General Settings.
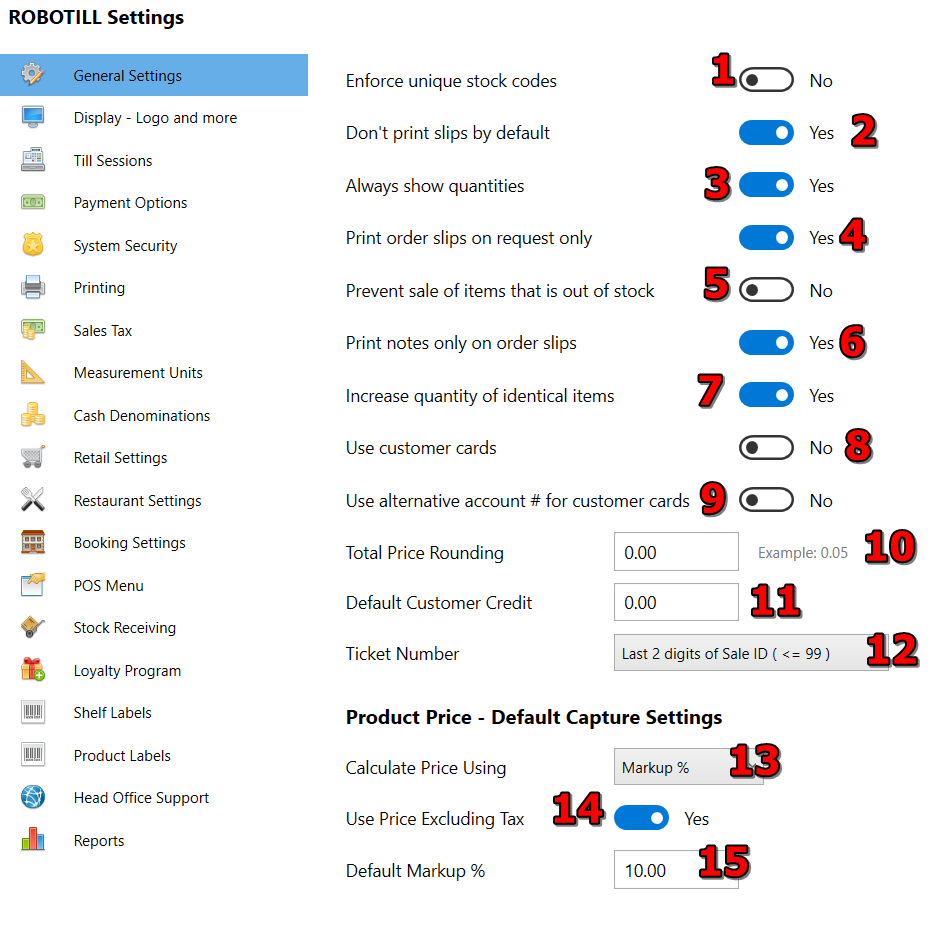
- By default stock codes are not unique. If you want to use unique stock codes, enable this option. Note that it will not remove any duplicates that were created before you enabled the option, it will only prevent you from creating new duplicate stock codes.
- By default a till slip (receipt) will be printed for each sale. You can turn automatic printing off. If a receipt is then required you can use the 'Print Last Slip' button in the POS Applications.
-
This option was removed in version 9.14.4. For performance reasons, ROBOTILL will now automatically hide compound stock item
quantities during a product search that result in very large amounts of products being displayed. The user will be informed
to further filter the search to see compound stock quantities.
- Order slips are usually printed when a waiter places an order in the restaurant module, or when a delivery order is created in the retail or restaurant module. Most users would not want to print order slips when a sale is completed.
- You can prevent sales of items that is out of stock. This will usually happen when the user forgot or did not yet have time to do a 'stock receiving'. You can use this option to force employees to do stock receiving on time.
- During a sale the cashier can add notes to an item. By default the notes are only printed on the order slips that is sent to the various departments (Kitchen, Bar, Workshop, etc). You can however choose to also print the notes on other forms like the receipts.
- By default, if you add the same item more than once to a sale, then the same item quantity will be increased instead of adding another line for the same item. This is ideal for retail shops to help save slip paper. Restaurants usually need to keep items separate as they need to add attributes or notes to each item.
- Select this option if you use customer cards. It can be cards that are swiped at a card reader or a card that is printed with a barcode containing the customer account number. You will still be able to search for a customer if needed.
- You can choose if the system allocated account number or your own customer account numbers must be used when a customer card is scanned or swiped.
- See Sale Rounding
- You can specify a default credit limit when a new customer is created. The credit limit can still be changed once the customer is created.
- A ticket number is a shorter version of the Sale ID that can be used to call customers when their order is ready. You can choose if you want to use the last 2, 3 or 4 digits of the transaction ID. If for example you choose 2 digits, the ticket numbers will go from 1 to 99 and then start at 1 again. Keep in mind that there might be numbers that are skipped as some sale/transaction ID numbers are discarded.
- You can choose if the want to use markup [(Profit/Cost) x 100] or profit margin [(Profit/Selling Price) x 100] to calculate the price. Using margin or markup is optional as you can just enter any selling price you want in the product set-up.
- You can choose if the markup / margin calculation should use price including or excluding tax.
- You can choose a default margin/markup. It can still be changed per product if needed.
Display Settings
To open display settings, go to ROBOTILL Back Office > Home > Setup and Settings > Settings > Display Settings.
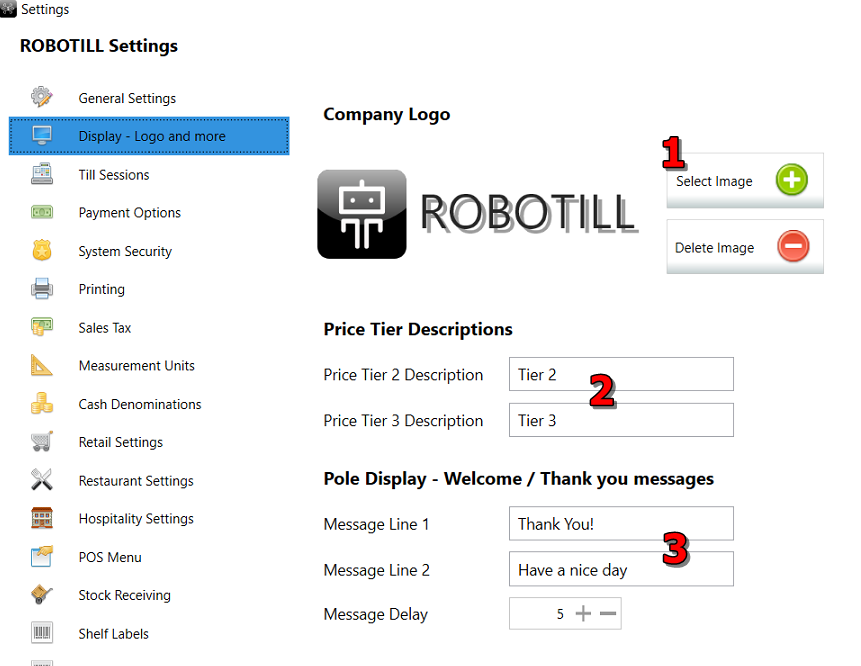
- You can replace the system logo that is displayed in the POS applications with your own company logo. The image will be stretched to fit into the logo boxes. The size is not that important but you should use a image with more or less the same dimensions. Usually a logo with a white background will look better in the POS Apps.
- You can change the name of a tier price - for example to 'Happy Hour'. See Price Modes and Price Tiers
- The message that will be shown in the Customer Pole Display (optional). The delay is how long after a sale was comleted the message should display.
Measurement Units
To open Measurement Units Settings, go to ROBOTILL Back Office > Home > Setup and Settings > Settings > Measurement Units.
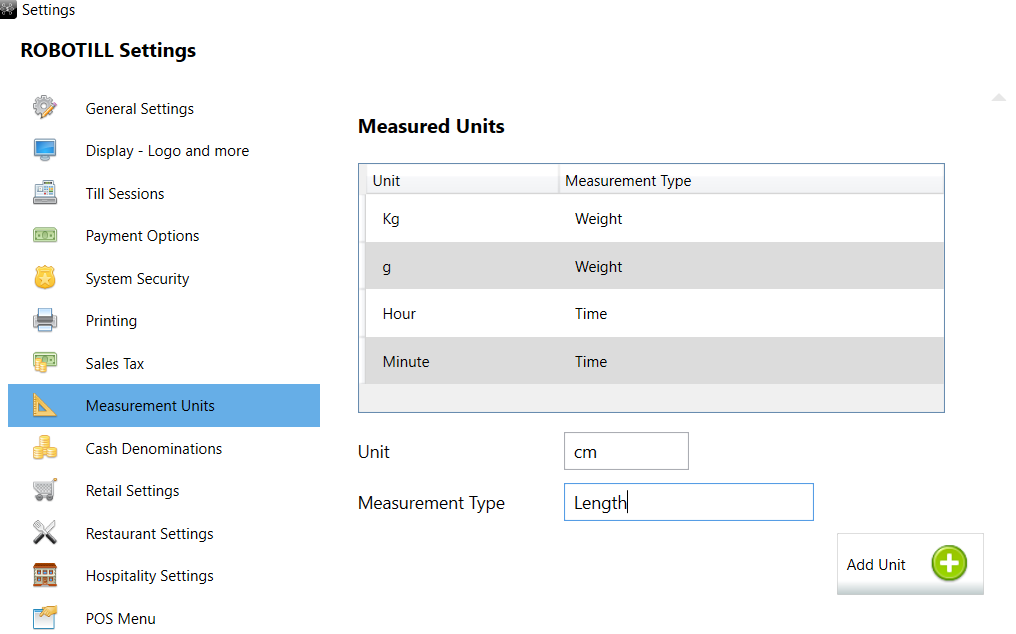
You can add any measurement unit that is needed. To edit or delete a unit, select the unit.
To see how measurement units are used see Measured Items
Retail Specific Settings
To open retail settings, go to ROBOTILL Back Office > Home > Setup and Settings > Settings > Retail Settings.
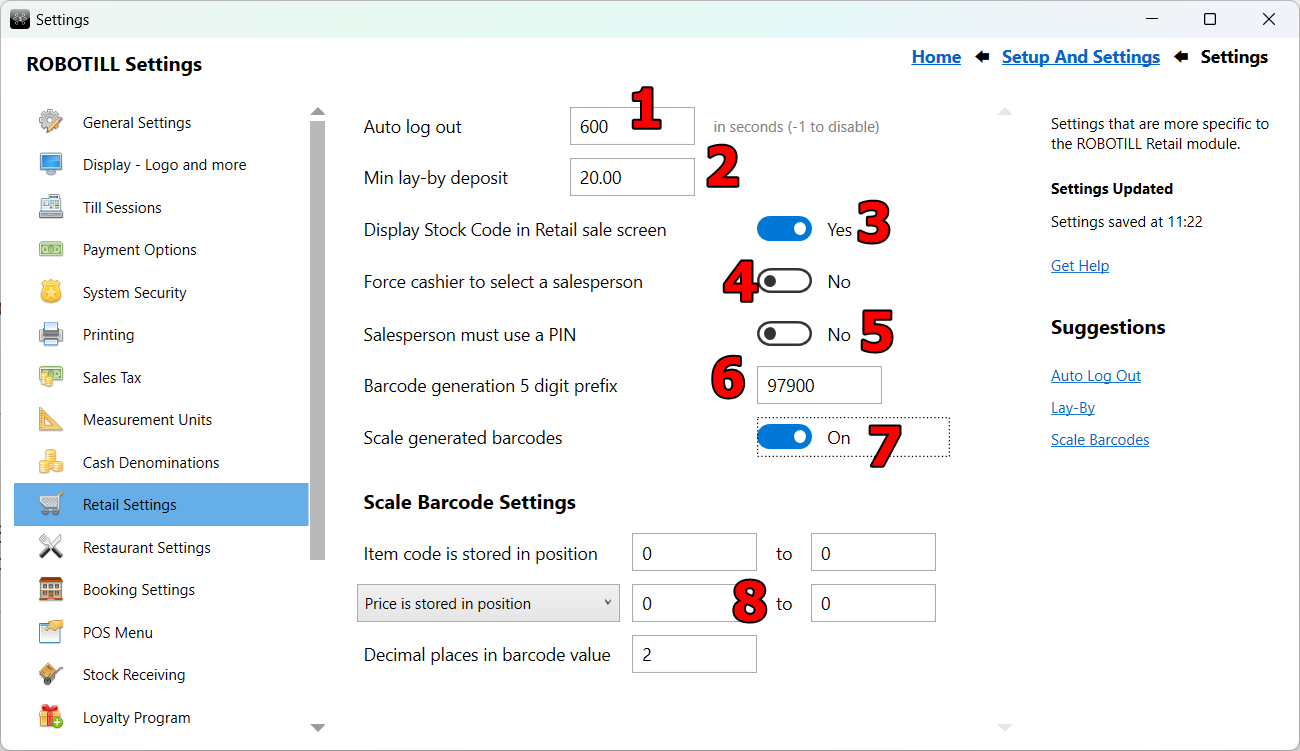
- The time in seconds when the user should automatically be logged out if no user input were detected. To deactivate enter minus one (-1). See Auto Logout
- The minimum deposit for a lay-by. See Lay-By.
- Will display the stock code in the sale display in the retail app.
- See Salesperson
- See Salesperson
- Barcode number prefix for barcode generation.
- Select 'On' if you are using scale generated barcodes.
- See scale generated barcodes
Restaurant Specific Settings
To open restaurant settings, go to ROBOTILL Back Office > Home > Setup and Settings > Settings > Restaurant Settings.
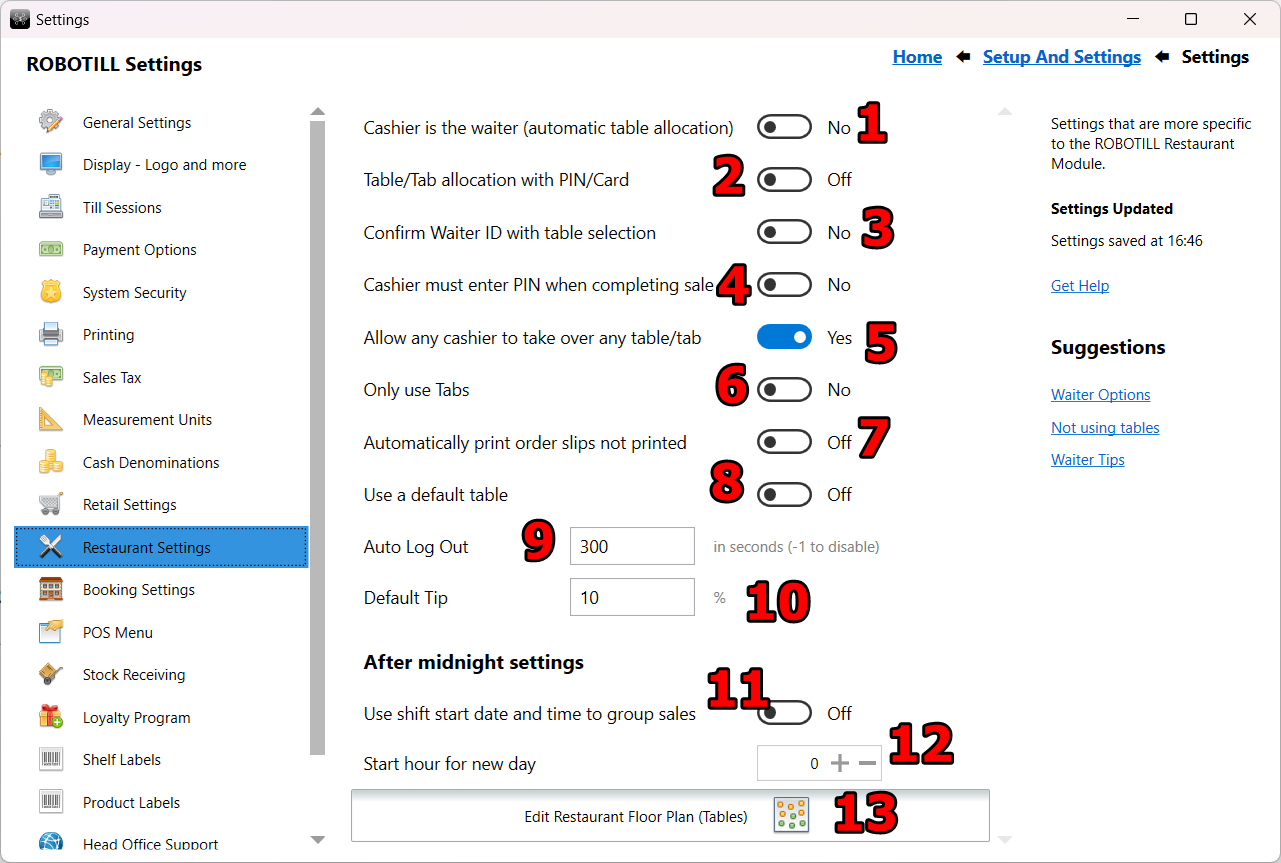
- Select this setting if the cashier and waiter is the same person. This setting is usually selected if no waiters are used (for example in a fast food shop) or if the waiter is the cashier (some restaurants let the waiters carry a money bag so that each waiter can also be his/her own cashier).
- When a table is selected, the waiter must enter his PIN or scan/swipe his employee card so that the table can be allocated to him. If this option is not selected the cashier will need to select a waiter from the list (unless the 'cashier is the waiter' option was chosen).
- If this option is chosen a waiter must enter his PIN or swipe/scan his card each time he selects his table (even if the table is already allocated to him).
- If this option is chosen the logged in cashier will need to confirm their PIN or scan/swipe their card to confirm their identity before completing the sale.
- If this option is chosen the logged in cashier can take over any table by simply selecting it. If it is not selected, only the users authorized in task security will be able to authorize the take-over.
- You can choose to only use Tabs. Table selection and the table floor plan will fall away if this option is selected.
- An order slip with new ordered items will be printed when a waiter selects the 'Order' button. If you select this option an order slip will automatically be printed if the waiter logs out but an order slip was not printed for new items (in case the waiter forgets to press the order button).
- See Using a Default Table
- The time in seconds when the user should automatically be logged out if no user input were detected. To deactivate enter minus one (-1). See Auto Logout
- The default percent tip that can be changed by the waiter. See waiter tips
- See 'After Midnight Settings' note below.
- See 'After Midnight Settings' note below.
- See Restaurant Floor Plan
For a detailed description on most of these settings see the video Tables and Tabs.
For more information on different waiter options see
Waiter Options.
After Midnight Settings
After midnight settings are used if you have a restaurant or pub that stays open after midnight. Usually a new day starts at 00:00 but if you stay open after midnight this will split a shift into two separate days.
You can choose the shift start date and time (the date and time the cash drawer was allocated to a user) for the date in reports instead of the sale date and time. This will prevent the sales of a single shift to be grouped into two separate days. Only reports and charts that group sales by date will be affected.
If you work after midnight you can choose at what time your day should start. For example if your restaurant/bar stays open until 2 AM - 3 AM and you open again at 9 AM, you can choose to start your day at 08:00. This setting will be applied to all the date filters for reports. For example if you filter a report for a single day and your start of day is at 08:00, the the report will start at 08:00 of the selected day and will include all sales up until 07:59 of the next morning.
Booking Specific Settings
To open booking settings, go to ROBOTILL Back Office > Home > Setup and Settings > Settings > Booking Settings.
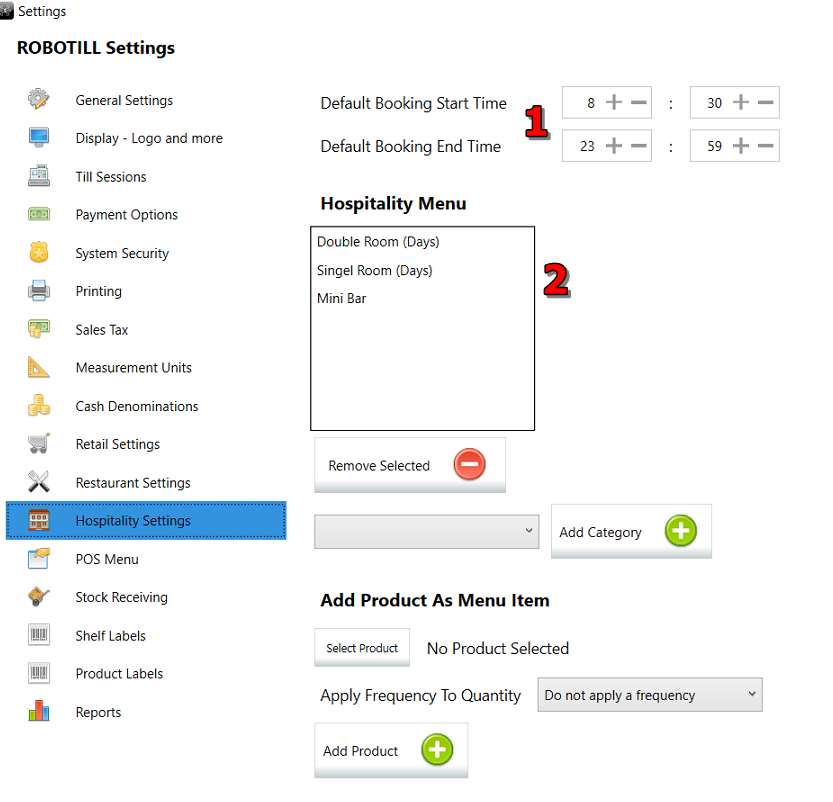
- You can set a default start and end time for bookings. The defaults will be used when a new booking window is opened but it can be changed when the booking is created or edited.
- See Booking Menu
Stock Receiving Settings
To open stock receiving settings, go to ROBOTILL Back Office > Home > Setup and Settings > Settings > Stock Receiving.
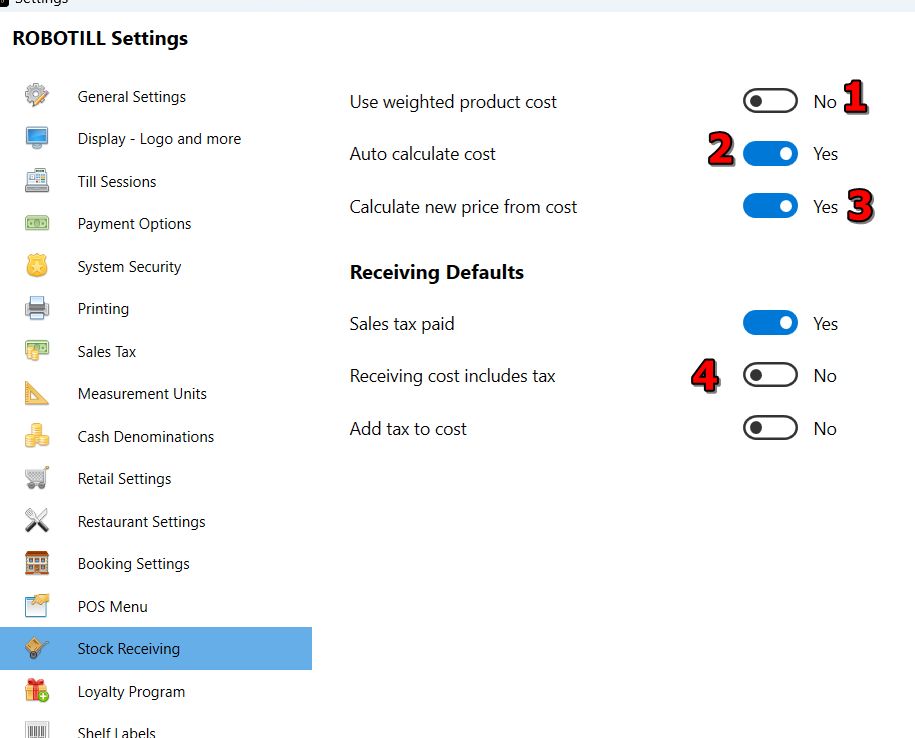
- When calculating using weighted product cost, the new product cost will be adjusted to take existing stock with a different product cost into consideration.
- When you select this option and you do a price change, the product cost will be calculated. Cost per item will be calculated (amount paid divided by quantity) as well as any affected sub items.
- If the product cost (the price you pay the supplier) changes the product price (the price you charge) will automatically be updated using your current profit margin / markup. You can choose to not let the price of the product change if the cost changes during stock receiving.
- These settings are the defaults when receiving an invoice. The defaults can be changed at the time of receiving the invoice.
To see what they are used for see
Stock Receiving